毎月、締日の翌日に利用した数量と期間に応じて決済するシステムを作ることになった。
これまでの記事はこちら


ライブラリのインストール
StripeのAPIを使用するために、公式ライブラリをインストールする。
インストール方法
Composerでライブラリをインストールする。
composer require stripe/stripe-phpCustomer(顧客)の作成
今回はシステムの利用登録の段階では支払い方法の設定が不要なので、Stripe側のCustomerの作成のみを行う。
システム側の利用登録の段階で支払い方法の設定も必要な場合は、後述する「決済手段設定画面」〜「応答処理」を同時に組み込む必要がある。
実装
必須パラメータはないが、Stripeの管理画面で困らない程度の情報は入れておいたほうが好ましい。
下記のコードでは顧客名(name)とメールアドレス(email)の他に説明文(description)にシステム側のIDを入れている。
他にも住所(address)や電話番号(phone)を登録することができる。
また、それ以外にmetadataにキーと値をセットすることで必要な項目を登録することができるので、Stripe側に保存されていれば事足りる場合は、ここに必要な情報を追加をしてStripe側で管理することもできる。
公式APIリファレンス:https://docs.stripe.com/api/customers/create
Stripe::setApiKey("連結アカウントのシークレットキー");

$customer = \Stripe\Customer::create([
	"description" => "説明文",
	"name" => "顧客名",
	"email" => "顧客メールアドレス"
]);
Customerオブジェクトが返ってくるので、システム側の顧客情報にCustomer ID($customer->id)を登録する。
動作確認
連結アカウントの管理画面で実行結果を確認。
連結アカウントの管理画面左側の顧客をクリック。
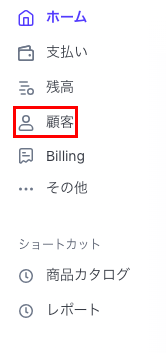
正常に顧客が作成できていれば、リストの中に作成した顧客がいるはずなのでクリック。
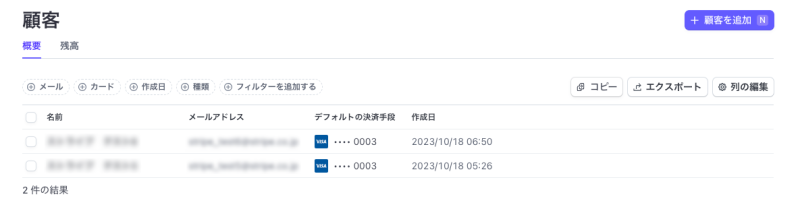
APIで登録した顧客情報が入っているかを確認。
決済手段設定画面の作成
都度決済ではないので、先に決済手段を選択して情報を入力する必要がある。
本番環境はhttpsでないと動かないので注意。
実装(html)
headタグの中に下記コードを記載。
StripeのJavaScriptを使えるようにする。
Laravelの場合、metaタグでCSRF tokenを埋め込んでおく必要がある。
<head>
	<meta id="csrf-token" content="{{ csrf_token() }}">
	<script src="https://js.stripe.com/v3/"></script>
</head>
フォームを作成。
@csrfはLarvelで必要なものなので、Laravelでない場合は不要。
<form id="payment-form" style="margin: 10px;">
	@csrf
	<div id="payment-element">
		<!-- Elements will create form elements here -->
	</div>
	<div id="error-message">
		<!-- Display error message to your customers here -->
	</div>
	<div class="button__area">
		<button type="button" class="button button--short" onclick="location.href='./'">
			<span>戻る</span>
		</button>
		<button class="button button--short" id="submit">
			<span>登録</span>
		</button>
	</div>
</form>
JavaScriptで使う定数を持たせておく。
PHPで動的に入れている。
<script type="text/javascript">
	const publicKey = '連結アカウントの公開可能キー';
	const cardName = '顧客名';
</script>
実装(JavaScript)
連結アカウントの公開可能キーはHTMLに持たせた定数を使用。
const stripe = Stripe('連結アカウントの公開可能キー');Payment Element(Stripeが構築したUIコンポーネント)のインスタンスを作成。
オプションのmodeにはsetup、paymentMethodCreationにはmanualをそれぞれ設定。
currencyは使用する通貨に応じて設定。日本円ならjpy、米ドルならusdとする。
appearanceはシステム側のデザインに合わせてカスタマイズすることができる。
サポートされている通貨についてはこちら。
appearanceの詳細についてはこちら。
インスタンス作成時にlayoutを渡すことでレイアウトのカスタマイズができる。
今回はアコーディオンタイプを使用。
決済手段はクレジットカードのみなので、radiosとspacedAccordionItemsはfalseにした。
const options = {
	mode: 'setup',
	currency: 'jpy',
	paymentMethodCreation: 'manual',
	// Fully customizable with appearance API.
	appearance: {/*...*/},
};

// Set up Stripe.js and Elements to use in checkout form
const elements = stripe.elements(options);

// Create and mount the Payment Element
const paymentElement = elements.create('payment', {
	layout: {
		type: 'accordion',
		defaultCollapsed: false,
		radios: false,
		spacedAccordionItems: false
	}
});
Payment Elementのインスタンスをマウント。
paymentElement.mount('#payment-element');ブラウザ上ではこうなる。
実際にブラウザ上で確認をしながらデザインの調整をすると楽。
PaymentMethodの作成
ここの部分については、実装から執筆までの間に仕様変更があったため古い情報となる。
動かないことはないので一応解説。
公式ドキュメント(旧):https://docs.stripe.com/payments/finalize-payments-on-the-server-legacy?platform=web&type=setup#create-pm
これから実装する場合はConfirmationTokenを作成する新しい仕様で実装することをおすすめする。
公式ドキュメント(新):https://docs.stripe.com/payments/finalize-payments-on-the-server?platform=web&type=setup#create-ct
PaymentMethodとは
PaymentMethodとはカードの有効期限や請求先住所など決済手段の詳細が含まれるオブジェクト。
実装
顧客名はHTMLに持たせた定数を使用。
公式JSリファレンス:https://docs.stripe.com/js/payment_methods/create_payment_method
// Create the PaymentMethod using the details collected by the Payment Element
const {error, paymentMethod} = await stripe.createPaymentMethod({
	elements,
	params: {
		billing_details: {
			name: cardName,
		}
	}
});
PHPを叩く。
paymentMethod.idは必須。それ以外にシステム側で保持しておきたい値をパラメータに積んでおく。
下記コードではカードブランド・カード番号下4桁・有効期限年月を積んでいる。
LaravelではヘッダにX-CSRF-TOKENを入れないと419エラーになってしまう。
// Create the SetupIntent
var formData = new FormData();

formData.append('payment_method_id', paymentMethod.id);
formData.append('brand', paymentMethod.card.brand);
formData.append('last4', paymentMethod.card.last4);
formData.append('exp_month', paymentMethod.card.exp_month);
formData.append('exp_year', paymentMethod.card.exp_year);

var token = $('#csrf-token').attr('content');

const res = await fetch("/api/create-confirm-intent", {
	method: "POST",
	headers: {
		'X-CSRF-TOKEN': token
	},
	body: formData
});

const data = await res.json();
SetupIntentの作成
仕様変更前と仕様変更後でパラメータに若干の違いはあるが、基本的な構造は同じ。
SetupIntentとは
SetupIntentとはクレジットカードの認証や銀行口座の有効性の確認など支払いに必要な認証情報が含まれるオブジェクト。
実装
支払い方法はクレジットカードのみ。顧客ごとにひとつでいいとのことなので、新しい支払い方法を登録する場合は既存の支払い方法を取り外す。
システム側の顧客情報にカード番号下4桁が保存されているか否かで既存の支払い方法があるか判別。
既存のPaymentMethodがあった場合はIDを取得しておく。
公式APIリファレンス:https://docs.stripe.com/api/payment_methods/customer_list
サポートされている決済手段のタイプについてはこちら。
\Stripe\Stripe::setApiKey("連結アカウントのシークレットキー");

$last_four_number = "既存のカード番号下4桁";

$detach_flg = false;
$previous_payment_method_id = "";
if(!is_null($last_four_number)){
	$payment_method_list = \Stripe\Customer::allPaymentMethods(
		"Customer ID",
		[
			'type' => 'card'
		]);

	$previous_payment_method_id = $payment_method_list->data[0]->id;

	$detach_flg = true;
}
エラーのタイプごとに定数定義。
タイプごとに処理を変えるために細かく設定しているので、共通の処理でいい場合は必要がない。
エラーのタイプについてはこちら。
const CARD_EXCEPTION = 1;
const RATE_LIMIT_EXCEPTION = 2;
const INVALID_REQUEST_EXCEPTION = 3;
const AUTHENTICATION_EXCEPTION = 4;
const API_CONNECTION_EXCEPTION = 5;
const API_ERROR_EXCEPTION = 6;
const OTHER_EXCEPTION = 7;
SetupIntentを作成。
POSTで渡されたPaymentMethod IDのほか、Customer ID、遷移先URLなどを設定。
下記コードのIPアドレスとユーザーエージェントはLaravelの機能で取得しているので、環境に応じた方法で取得。
公式APIリファレンス:https://docs.stripe.com/api/setup_intents/create
try {
	$setup_intents = \Stripe\SetupIntent::create(
		[
			"confirm" => true,
			"customer" => "Customer ID",
			"automatic_payment_methods" => [
				"enabled" => true,
			],
			"payment_method" => "PaymentMethod ID",
			"return_url" => "遷移先URL",
			"mandate_data" => [
				"customer_acceptance" => [
					"type" => "online",
					"online" => [
						"ip_address" => request()->ip(),
						"user_agent" => request()->header("User-Agent")
					]
				]
			]
		]
	);
} catch(\Stripe\Exception\CardException $e) {
	return array("error" => true, "error_id" => StripeConst::CARD_EXCEPTION);
} catch (\Stripe\Exception\RateLimitException $e) {
	return array("error" => true, "error_id" => StripeConst::RATE_LIMIT_EXCEPTION);
} catch (\Stripe\Exception\InvalidRequestException $e) {
	return array("error" => true, "error_id" => StripeConst::INVALID_REQUEST_EXCEPTION);
} catch (\Stripe\Exception\AuthenticationException $e) {
	return array("error" => true, "error_id" => StripeConst::AUTHENTICATION_EXCEPTION);
} catch (\Stripe\Exception\ApiConnectionException $e) {
	return array("error" => true, "error_id" => StripeConst::API_CONNECTION_EXCEPTION);
} catch (\Stripe\Exception\ApiErrorException $e) {
	return array("error" => true, "error_id" => StripeConst::API_ERROR_EXCEPTION);
} catch (Exception $e) {
	return array("error" => true, "error_id" => StripeConst::OTHER_EXCEPTION);
}
デフォルトのPaymentMethodを設定。
公式APIリファレンス:https://docs.stripe.com/api/customers/update
\Stripe\Customer::update(
	"Customer ID",
	[
		"invoice_settings" => [
		"default_payment_method" => "PaymentMethod ID"
	]
]);
POSTで渡されたカードブランド・カード番号下4桁・有効期限年月を使用してシステム側の顧客情報を更新。
既存のPaymentMethodを取り外す。
公式APIリファレンス:https://docs.stripe.com/api/payment_methods/detach
if($detach_flg){
	// 既存のpayment_methodを取り外す
	$stripe = new \Stripe\StripeClient("連結アカウントのシークレットキー");
	$stripe->paymentMethods->detach("既存のPaymentMethod ID");
}
応答処理
PHPから戻ってきたら、結果に応じて処理を行う。
実装
応答結果を判別して処理を分岐するための関数。
PHPからの戻り値を渡す。
// Handle any next actions or errors. See the Handle any next actions step for implementation.
handleServerResponse(data);
エラータイプを3つに分けて処理。
- カード認証エラー
error_id:1(CARD_EXCEPTION・カード認証エラー)
画面遷移をせずに決済設定フォームにエラーメッセージを表示。
再入力できるように、submitボタンのdisabledを解除。 - システム側のプログラムエラー
error_id:3(InvalidRequestException・リクエスト無効)
error_id:4(AuthenticationException・APIキーを変更した場合などに起こるStripeの認証エラー)
システム側のプログラムになにか問題が発生している可能性がある。
決済設定フォームのリンク元へリダイレクトをして、エラーメッセージを表示。 - システム側のプログラムとは関係のないエラー
error_id:2(RateLimitException・APIが短時間のうちに過剰な回数が叩かれたときにロックされた状態)
error_id:5(ApiConnectionException・ネットワーク接続エラー)
error_id:6(ApiErrorException・Stripe側のプログラムエラー)
error_id:7(その他のエラー)
決済設定フォームのリンク元へリダイレクトをして、エラーメッセージを表示。
追加で認証が必要な場合や別サイトへのリダイレクトが必要な場合は、ステータスがrequires_actionとなり、後続処理を行う必要がある。
ここでエラーになった場合も決済設定フォームのリンク元へリダイレクトをして、エラーメッセージを表示。
公式JSリファレンス:https://docs.stripe.com/js/payment_intents/handle_next_action
処理が正常終了した場合も決済設定フォームのリンク元へリダイレクトをして、処理完了のメッセージを表示。
ここの処理は一例になるので、決済フォームに直接表示をするでも、リンク元にリダイレクトをするでも、処理完了用のページに遷移するでも、システムに合わせて設定すればよい。
const handleServerResponse = async (response) => {
	if (response.error) {
		// Show error from server on payment form
		if(response.error_id === 1){
			const messageContainer = document.querySelector('#error-message');
			messageContainer.textContent = 'カード情報の認証に失敗しました。入力内容に間違いがない場合は、他のクレジットカードを試すか詳細を加盟クレジット会社へ問い合わせてください。';
			submitBtn.disabled = false;
		}else if(response.error_id === 3 || response.error_id === 4){
			location.href = 'リダイレクトURL(エラー)';
		}else{
			location.href = 'リダイレクトURL(エラー)';
		}
	} else if (response.status === "requires_action") {
		// Use Stripe.js to handle the required next action
		const {
			error,
			setupIntent
		} = await stripe.handleNextAction({
			clientSecret: response.clientSecret
		});


		if (error) {
			// Show error from Stripe.js in payment form
			location.href = 'リダイレクトURL(エラー)';
		} else {
			// Actions handled, show success message
			location.href = 'リダイレクトURL(正常終了)';
		}
	} else {
		// No actions needed, show success message
		location.href = 'リダイレクトURL(正常終了)';
	}
}
動作確認
Stripeが用意したテストカードを使用して、認証のテストを行う。
正常系のテストカードの他に、各エラーが発生する異常系のテストカードも用意されている。
テストカードはこちら。
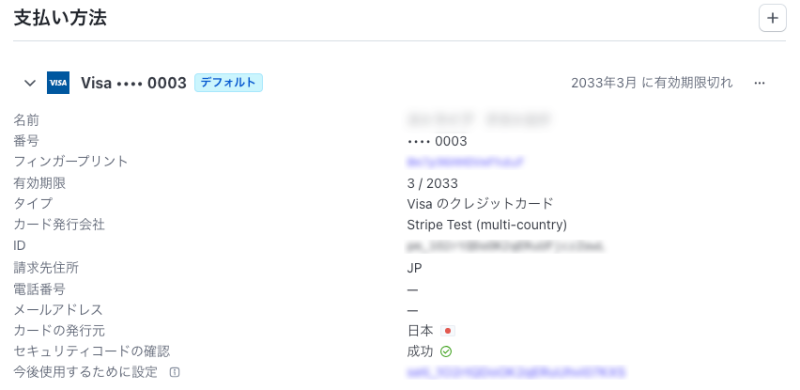
連結アカウントの管理画面で実行結果を確認。
連結アカウントの管理画面左側の顧客をクリック。
該当の顧客をクリック。
APIで登録した支払い方法が入っているかを確認。
ソースコード
const stripe = Stripe('連結アカウントの公開可能キー');

const options = {
	mode: 'setup',
	currency: 'jpy',
	paymentMethodCreation: 'manual',
	// Fully customizable with appearance API.
	appearance: {/*...*/},
};

// Set up Stripe.js and Elements to use in checkout form
const elements = stripe.elements(options);

// Create and mount the Payment Element
const paymentElement = elements.create('payment', {
	layout: {
		type: 'accordion',
		defaultCollapsed: false,
		radios: false,
		spacedAccordionItems: false
	}
});

paymentElement.mount('#payment-element');

const form = document.getElementById('payment-form');
const submitBtn = document.getElementById('submit');

const handleError = (error) => {
	const messageContainer = document.querySelector('#error-message');
	messageContainer.textContent = error.message;
	submitBtn.disabled = false;
}

form.addEventListener('submit', async (event) => {
	// We don't want to let default form submission happen here,
	// which would refresh the page.
	event.preventDefault();

	// Prevent multiple form submissions
	if (submitBtn.disabled) {
		return;
	}

	// Disable form submission while loading
	submitBtn.disabled = true;

	// Trigger form validation and wallet collection
	const {error: submitError} = await elements.submit();
	if (submitError) {
		handleError(submitError);
		return;
	}

	// Create the PaymentMethod using the details collected by the Payment Element
	const {error, paymentMethod} = await stripe.createPaymentMethod({
		elements,
		params: {
			billing_details: {
				name: cardName,
			}
		}
	});

	if (error) {
		// This point is only reached if there's an immediate error when
		// creating the PaymentMethod. Show the error to your customer (for example, payment details incomplete)
		handleError(error);
		return;
	}

	// Create the SetupIntent
	var formData = new FormData();

	formData.append('payment_method_id', paymentMethod.id);
	formData.append('brand', paymentMethod.card.brand);
	formData.append('last4', paymentMethod.card.last4);
	formData.append('exp_month', paymentMethod.card.exp_month);
	formData.append('exp_year', paymentMethod.card.exp_year);

	var token = $('#csrf-token').attr('content');

	const res = await fetch("/api/create-confirm-intent", {
		method: "POST",
		headers: {
			'X-CSRF-TOKEN': token
		},
		body: formData
	});

	const data = await res.json();
	console.log(data);

	// Handle any next actions or errors. See the Handle any next actions step for implementation.
	handleServerResponse(data);
});

const handleServerResponse = async (response) => {
	if (response.error) {
		// Show error from server on payment form
		if(response.error_id === 1){
			const messageContainer = document.querySelector('#error-message');
			messageContainer.textContent = 'カード情報の認証に失敗しました。入力内容に間違いがない場合は、他のクレジットカードを試すか詳細を加盟クレジット会社へ問い合わせてください。';
			submitBtn.disabled = false;
		}else if(response.error_id === 3 || response.error_id === 4){
			location.href = 'リダイレクトURL(エラー)';
		}else{
			location.href = 'リダイレクトURL(エラー)';
		}
	} else if (response.status === "requires_action") {
		// Use Stripe.js to handle the required next action
		const {
			error,
			setupIntent
		} = await stripe.handleNextAction({
			clientSecret: response.clientSecret
		});


		if (error) {
			// Show error from Stripe.js in payment form
			location.href = 'リダイレクトURL(エラー)';
		} else {
			// Actions handled, show success message
			location.href = 'リダイレクトURL(正常終了)';
		}
	} else {
		// No actions needed, show success message
		location.href = 'リダイレクトURL(正常終了)';
	}
}
続きはこちら:Stripeで従量制月次決済 その4【実装編2】
決済前に必要な処理までの実装が終わったので、次回はいよいよ最終回。支払いタイプと決済処理の実装について解説。